

How To Professionally Edit Makeup In Gimp
Tabular array of Contents
- Table of Contents
- Motivation
- An introduction to Macros
- Macro Implementation – in Broad Strokes
- Architecture
- Execution Model
- Data Model
- Trees and XML Data
- Macro Implementation – Revisited
- Pseudo Code to XML
- Displaying the Macro Names in a Carte du jour
- Running a Specific Macro
- Commander Macros – Summary
- An Introduction to Automated Editing
- Automation Tool Implementation – In Broad Strokes
- Compages
- Execution Model
- Information Model
- The Prototype and Parasites (or Belongings) Data
- Running the Automation Tools on a Workflow
- Automation Tool Implementation – Details
- Pseudo Code
- Workflow Pseudo Code
- Property / Parasite Pseudo Lawmaking
- Properties and Epitome State – Flow Command Parasites
- Condition Flag Parasites
- Automation Workflow - Summary
- Pseudo Code
- Decision
- Appendix – Notes
- Setting upwardly the Example Scripts
- Setting up the Instance Pseudo Code
- Pseudo Lawmaking for Commander Macros
- Pseudo Lawmaking for Automation Workflows
- Pseudo Code for Properties
- Pseudo Code Syntax
- Commander Pseudo Code
- Property Pseudo Code
- Flow Pseudo Code
- Running code in the Gimp Python Console
- Further Reading
Motivation
This tutorial volition draw and provide examples for two types of automation functions. The beginning function is a tool to capture and execute "Macro" commands. The second office is a set up of Automation Tools to capture and run a "Flow" or "Procedure". The code for this tutorial is written using Gimp-Python and should be platform portable – able to run on either Linux or Windows operating systems. *
The goal of these functions is to provide tools that speed up the editing process, make the editing process more than repeatable, and reduce the amount of button pushing the user has to practise. Taking over the button pushing and book-keeping chores allows the user to focus on the more than artistic part of the editing procedure.
These automation tools are examples and then delight modify them to adapt your needs. The goal of the tutorial is to provide and explicate a working case. If the coding way seems a fleck rough, I repent, I am not a developer.
The chief body of this tutorial volition be discussing the ideas behind automating the editing process. Hopefully we can proceed the focus on the concept without getting lost in the details of the included instance. The details of how to setup and run the example lawmaking and what the automation instance is supposed to accomplish will be covered in appendices to the tutorial. We are not going to cover python programing as it is already well documented.
This tutorial volition use some of the concepts covered in an earlier tutorial "Automated Jpg to Xcf". It would probably be helpful to read through the earlier tutorial for introductory example.
* Hopefully it is piece of cake to adapt it to Apple tree OS as well.
An introduction to Macros
Before we dive into a description of the code, allow's accept a cursory walk through the process of capturing and running a "Macro".
Suppose we wanted to set up the grid spacing so that it is centered on the image, is a foursquare filigree, is scaled then there are 24 grid blocks in the 'long' dimension, and is an on-off nuance pattern. Nosotros could enter the following code fragment in the Gimp "Python Panel" (under the "Filters" pull down menu) to set the grid up.
Example - GIMP-Python Code Fragment
>>> theImage = gimp . image_list ()[ 0 ] >>> centerX = theImage . width / 2 >>> centerY = theImage . height / 2 >>> gridSpacing = max ( theImage . width , theImage . height ) / 24 >>> pdb . gimp_image_grid_set_offset ( theImage , centerX , centerY ) >>> pdb . gimp_image_grid_set_spacing ( theImage , gridSpacing , gridSpacing ) >>> pdb . gimp_image_grid_set_style ( theImage , GRID_ON_OFF_DASH ) 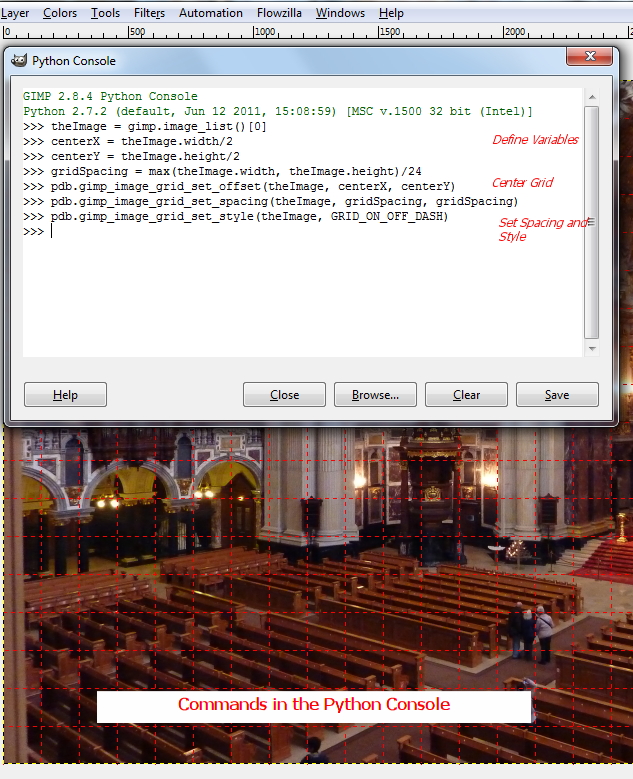
If you watch the epitome as y'all enter the commands and have the Grid turned "ON" you will see the filigree spacing on the active image change as we execute these commands.
The tool nosotros are writing in this tutorial will let us to copy this lawmaking fragment into a text file, add a name and optional comments, and access information technology through a card widget then we can rerun this lawmaking fragment on other images. The tool will access the "macro" code fragment using the name we assigned through a pull downwards menu.
The ability to save the macro code fragments allows usa to build up a library of editing shortcuts that will not just save time, but do the job better than you could exist simply pushing the buttons. In this example we made the filigree spacing based on a percentage of the image size rather than a fixed size in either inches, pixels, or cm.
Macro Implementation – in Broad Strokes
Let's touch on upon the main ideas that nosotros are going to utilise to implement the macro recording and execution scheme that we can utilise to capture and run a set of commands.
- The command set up will be read and parsed into a data structure. Each command set block volition take a proper name and consist of commands and comments.
- The data structure will be read for a list of macro names. This list will be used to populate a GUI widget so we can select a macro by proper noun.
- From the named Macro, the data structure will render a listing of commands.
- The list of commands will be run in an 'exec' loop:
Example "Exec" Loop:
for Cmd in commandList: exec ( Cmd ) 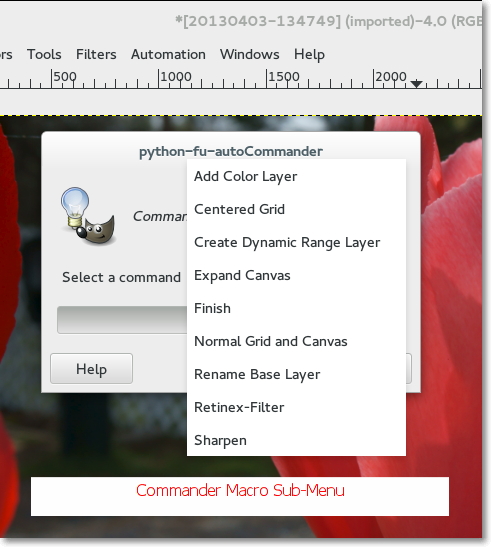
Architecture
When you want to write a script to provide a unmarried part, the common and obvious arroyo is to write a unmarried in-line programme, register the programme, and provide a user interface if it is called for. Our Automation Example is multi-functional – more than like a system, and we desire to leave some of the functionality somewhat fluid. If we consider the system (information and code) and make practiced architectural choices we tin can attain our goal without making the code overly complex.
Execution Model
We will exist breaking the execution of our automation functions into 3 different categories:
- User Interface Functions
- Base Class and Functions
- Pseudo Lawmaking
Allow'due south examine these categories briefly:
The User Interface Functions are the meridian level function that are activated from the menus. They are the 'main' function, the Registration Block, and the function that is registered in the Registration Cake. We volition exist deliberately keeping the User Interface Role code sparse. While the UI Functions afford lot of functionality, they are rather frail and hard to debug. The arroyo we will apply is to get the UI running and phone call a part that tin be written and debugged independently minimizing the edits to the User Interface.
The Base Form and Functions are just normal python classes and functions that tin exist run from a shell. These functions do not depend upon the gimpfu library could exist run in any python shell (including the Gimp-Python Vanquish).
- If you make a syntax error in the course of an edit, you want to be able to chop-chop isolate it to a particular line in a particular function. This is easier to practise from the shell than when running the program from a GUI.
- Keeping the generic python code separate from the code that depends upon the gimpfu library minimizes the impact that hereafter releases of gimp will accept on the scripts. Because the gimp process calls are handled by Pseudo Code rather than the Base of operations Class and Functions we accept less run a risk of compatibility from futurity releases of Gimp within the Base Class and Role.
The Pseudo Code is the portion of the overall organization functionality that we want to deliberately leave fluid. The functionality of the Pseudo Lawmaking is intended to be unproblematic editing steps (which should cover a pretty wide range of edits).
- The types of things that yous might practice in Pseudo Code could include: re-create layers, proper noun layers, run filters, ready layer modes, set layer opacity, merge layers, and run PDB functions. The pseudo code tin can access basic epitome characteristics and perform operations with them.
- Pseudo Code is simple Gimp-Python code fragments. Considering there is no support for indenting, a simple test for how complex your Pseudo Code can go is whether you demand to indent or not (note that you tin can write a simple 'if' statement on one line). In spite of this restriction nosotros will bear witness with some examples that you can achieve quite a bit of editing with macros.
A concluding thing that we need to talk nigh that is not a 'category' of execution but is something that is an important part of our Execution Model is Telescopic . Nosotros are only going to touch on on a couple of points that affect when lists are defined for dynamic User Interface selection.
- The Gimp User interface widgets allow you to select items from a listing.
- You can specify the list inside the widget, or pass the widget a listing by proper noun IF you ascertain the list outside of the function being chosen. The list must be divers at the level of the role main().
- Past keeping the telescopic of the User Interface lists at the top level, nosotros are able to use the list proper noun in both the user interface and in the office being called . In this manner we can use the actual argument being selected rather than its index position in a list.
- An architectural reward is nosotros create this list with a function that reads a configuration file. Nosotros only accept to define and maintain this configuration list in one place within our system and apply the resulting list in equally many places as we desire by calling a reading function. This is how we will get new macros to testify upwardly in the menus when we add them.
- The following skeletal code fragments illustrate defining a listing 'cmdList' at the top level – 'principal', and using it within the registration cake and part. Because it is defined at the 'main' level, we can reference it within the function and registration block. We tin can recover the statement from the alphabetize (passed by the widget) because we are using the same list in both places:
Example - Lists and Scope in Functions
cmdList = cmdrReadObj . CommanderMacros () # def autoCommander ( theImage , cmdListIndex ) : ... commanderName = cmdList [ cmdListIndex ] ... # register ( "autoCommander" , # Name registered in Procedure Browser ... [ ... ( PF_OPTION, "cmdSet", "Select a command", 0, cmdList ), ] , master () Information Model
We at present need to talk about the course and organisation of the information that nosotros intend to use. The manner that we choose to organize our data tin can have a dramatic impact on the complexity of the functions that nosotros need to write. In our instance we tin take advantage of a couple of somewhat more sophisticated data models to make the actual functions fairly straightforward. We volition be using "copse" (Python ElementTree) and XML data.
Trees and XML Information
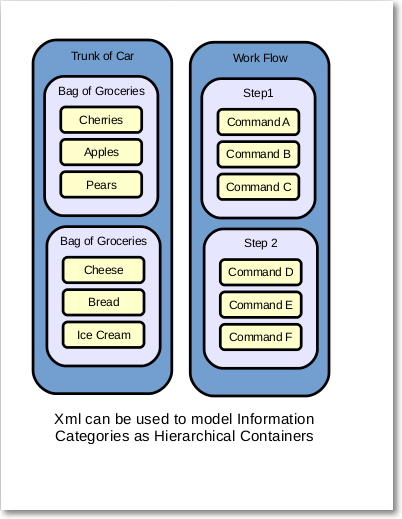
Python has several built in information structures such as dictionaries, lists to proper noun a couple. A very powerful library structure that is well suited to our particular needs is a "tree". A couple of the key features that make them well suited for our application are:
- Trees take a natural 'hierarchical' feel to them, kind of like a directory structure or the 'folders' of an operating system. The levels of hierarchy can be thought of as 'containing' the contents in the lower level.
- A branch can hold an indefinite number of elements, and those elements can be either a leafage with attributes or a sub-branch to another level. This lends a lot of flexibility with the way we structure the information.
- The input / output format is XML, which is not only hierarchical, but it is text so information technology is man readable and portable to any platform (computer / Bone).
The examples use ElementTree to read and write the data between trees and XML. ElementTree is included with Python and described in the Python documentation, so nosotros will not go into detail most the mechanics of tree structures here.
Yous might be wondering at this bespeak where these XML file will exist located. The functions that read and write the XML files are expecting to find the XML under a directory named 'myXml' which you lot will take to create under you user gimp directory. If you are using Linux and your abode directory is 'stephen' the path would look something similar:
/dwelling/stephen/.gimp-2.8/myXml If you are using Windows the path would await something like:
C:\Users\stephen\.gimp-2.8\myXml We will be dealing with a couple of types of pseudo code and xml files, and those volition be kept in dissever directories under myXml; however, we will get to that in a bit.
Macro Implementation – Revisited
At present that we have talked about the execution model and data model, nosotros can revisit the "Implementation – In Broad Strokes" and tie the steps to the code that is handling them.
Pseudo Code to XML
Our outset detail was to read the pseudo code and parse it into a information structure . That data structure is going to be a Tree.
We can begin writing a pseudo lawmaking file past copying and pasting a set up of commands from the gimp python panel into a text file whose name ends in ".def". The ">>>" preceding each command will be the "keyword" to indicate a command.
The pseudo code will be in a file, in this example it is named NormalGridCanvas.def. Each line begins with a keyword. Keyword choices are: "commander>", "macro>", "annotate>", or ">>>".
The form XmlGenerator() in autoBase.py contains a function GenCommanderXml() which reads all of the *.def files in ~/.gimp-two.8/myXml/commander, inserts the lines into a tree (after removing the keyword), and and so writes the tree out to a file named combinedCommander.xml.
The keyword will determine both the "tag" associated with the line of pseudo code, and whether it is a "branch" chemical element (macro name) or a "foliage" element (control or comment). We are assigning both a definition and a level in the bureaucracy for each line of pseudo code text as we read it into the tree.
Case - Pseudo Lawmaking Example - NormalGridCanvas.def
commander>Normal Grid and Sheet macro> comment>Shrink the Sheet dorsum to fit the layer >>>theImage.resize_to_layers() comment>Gear up grid to origin and size = image >>>pdb.gimp_image_grid_set_offset(theImage, 0, 0) >>>pdb.gimp_image_grid_set_spacing(theImage, theImage.width, theImage.height) Afterwards all of the *.def files are read into the tree and written back out in the class of an XML file, the formatting is done. Writing out a tree automatically generates all of the containing enclosures, substantially making properly formatting the XML a picayune task. The fragment from combinedCommander.xml illustrates the XML from the pseudo code in NormalGridCanvas.def.
Example - combinedCommander.xml (fragment)
<combined> Definition ... <commander> Normal Grid and Canvass <annotate> Shrink the Canvass dorsum to fit the layer </annotate> <control> theImage.resize_to_layers() </command> <comment> Prepare grid to origin and size = epitome </comment> <command> pdb.gimp_image_grid_set_offset(theImage, 0, 0) </control> <command> pdb.gimp_image_grid_set_spacing(theImage, theImage.width, theImage.tiptop) </command> </commander> ... </combined> * The XML in a higher place was run through an online XML pretty printer for readability. The XML from ElementTree is functional, but hard to read.
The Xml generator can be called from a GUI menu.
In our word of Telescopic in the Section "Execution Model", we showed an example code fragment where we created a listing "cmdList". The code was from the example autoCommander.py and uses a class BaseXmlReader and the function CommanderMacros() which resides in autoBase.py.
- The listing of Macro Command Names is created by loading the XML file combinedCommander.xml into an ElementTree.
- The tree is traversed at the branch level (the tag
), and the branches text which are the names of the macros are built into a listing. The list is essentially built with a "for loop". - The list is passed to the widget and used to select the macro you desire to use.
Running a Specific Macro
The concluding point to expand upon is how we fetch and run the specific set of commands for a selected Macro.
- We can derive the name of the Macro past style of the card selection (registration block of autoCommander.py).
- We will once more use the BaseXmlReader form, but this fourth dimension we will utilize the CommanderExtract office passing the Macro name as an argument. The CommanderExtract role traverses the tree branch past branch as before when we were gathering the names of the Macros, except it is comparison the names against the passed argument as nosotros go. When the CommanderExtract function finds a branch matching the argument, it drops down a level to read the leaf elements under that branch.
- The foliage arguments whose tags are fix to "command" are appended to the listing that will be returned for processing. The leafs whose tags are "comment" will be ignored.
- The newly created returned list will exist run through in a "for loop" which will procedure each line as a separate command using the python "exec" function.
The variable 'theImage' is divers with the autoCommander part and can be used as a handle to access information almost the active image past the Macro commands.
Commander Macros – Summary
The discussion above has described how we can generate a macro by running a fix of commands in the Python Panel, paste those commands into a text file adding a name and comments, and then making it available for use.
The lawmaking for transforming the pseudo code into a macro is in autoWriteXml.py. The code to brandish the card of Macros you have written and execute them is in autoCommander.py. The Classes referenced by these two scripts are in autoBase.py.
The text files that you lot write for your macro definition need to be put in a directory ~/.gimp-two.x/myXml/commander and have an extension of '.def'. Create a separate *.def file for each macro.
An Introduction to Automatic Editing
Macros are a terrific mode to make the editing process faster and more than repeatable, they do though have some limitations.
- There are times when the guild of the editing steps are of import.
- They have to be practical i at a fourth dimension.
- Yous have to go on rail of what has already been done and what nevertheless all the same remains.
A Workflow, or a Procedure, or a Recipe, what ever you may be used to calling it (I adopt Workflow) tin exist viewed as a set of ordered steps. These steps would normally correspond to the actions that y'all would typically lawmaking up in a prepare of Macros. We will automate a Workflow that runs the right steps at the right time and records the editing progress on each of the images.
Permit'due south apace go over how how capturing and running a "Workflow" is going to work earlier we dive in. We capture the code fragments that describe the editing process in the same way that we did for the macros. We tin either re-create and paste from the python console to generate a series of commands, or we could copy them from a working macro.
The steps in a workflow aren't in fact very different than the Commander Macros that we described in the earlier part of this tutorial, the only real departure is they are an ordered set to exist followed.
The way that nosotros are going to utilize the automation tools is a bit different than using macros. When we want to use a macro we are running it on the prototype that is open up in editor window. The automation tools on the other manus run on a directory of images, and so nosotros run it without an image existence open in the editor window.
We mark the images that are ready to move to the next step of the workflow and and then run the automation tools. The automatic update looks at each epitome in the work directory, if it is marked for update, information technology gets updated to the next step, if it is not marked for update information technology is left alone.
The automated update will move the marked images to the next step of their assigned workflow essentially keeping track of the 'book-keeping' for us. A time management benefit is if at that place are several images requiring a filter that takes a bit of time to run, you can go practice something else while they are running.
Let's touch upon the main ideas that we are going to utilize to implement the automated workflow recording and execution tasks that nosotros are talking about above.
- The pseudo code will be read and parsed into a data structure. Each pseudo code block (or step) volition have a proper name and consist of commands and comments. Each workflow will have a proper noun and volition contain an ordered set of steps or pseudo lawmaking blocks.
- The automation flow will generate a list of images in a given directory. It will and then step through that list checking whether an epitome is marked for update or not.
- If an image is marked for update, the automation catamenia will determine the name of the workflow and the name next step to perform on the image. The name of the 'workflow' and the 'next pace' will exist used to select a list of commands.
- The list of commands volition be run in an 'exec' loop:
- The 'current step' and 'next step' for the image will be incremented and then saved with the image.
Architecture
We commented in the department on macros that good architectural choices can achieve our goal without making the lawmaking overly complex. This argument is as compelling for automatic updating of our images. The Architecture and Code for our automated updating tools will be very similar to the ones used for capturing and running the "Commander" macros.
Execution Model
As in our discussion of the Macros, we will be breaking the execution of our Automation Functions into iii unlike categories:
- User Interface Functions
- Base Class and Functions
- Pseudo Lawmaking
We won't rehash these topics but instead annotate on the departure, which is the structure of the pseudo code. The organization of workflows as a gear up of steps where each step is a set of commands prompts us to organize the pseudo lawmaking in a like manner, where we remember of steps containing a sequence of commands, and workflows containing a sequence of steps. In gild to reflect this additional level of bureaucracy or containment, we will use an additional keyword in the workflow pseudo code.
Information Model
There are 2 special types of data for the automated menstruation:
- Trees and XML data are similar to the "Commander Macros".
- Parasite (or Property) data to keep track of the item workflow that is beingness used to edit an image, the next step that is to exist used, and whether an prototype is set up to exist incremented to the next footstep.
The Paradigm and Parasites (or Property) Information
The Image type that we volition be using for all of our piece of work is the native Gimp *.xcf format. This image format saves all of the layers and modes that we might fix while editing and likewise saves a type of data called Parasites, which are similar to Backdrop on many other systems.
Parasites are like variable can exist referenced by proper name in order to admission their value. Similar variables they can exist assigned and read. Different variables, parasites are persistent, very persistent. A parasite, when assigned to an prototype, becomes part of the prototype and is saved with the epitome file. A parasite that is assigned and saved with an image can be read afterward gimp is closed and reopened, information technology is just similar any other file data in that respect.
Parasites are also very portable, yous can read and write parasites using either the scheme based or python based scripts. They are besides independent of the operating system, and so y'all tin write a parasite to an image on your Linux Desktop machine, and read information technology a calendar week after on your windows based laptop assuming that you saved the images in the native gimp *.xcf file format. Parasites can besides exist written to specific layers, but for our nowadays needs, the image parasites are all we are using.
Because the parasite is associated with the image, and it is persistent until it is overwritten or removed, information technology is an ideal tool for keeping track of the state of the image'due south progress in the editing procedure. Beyond being able to but take notes, the values of the parasites can exist used similar a property to brand decisions and influence the execution of the script that has read the parasite data.
If for example we opened an image that had two parasites (properties), named 'UpdateFlag' and 'Menses', we could apply the values from those parasites to brand decisions:
Example – Decisions based on Parasite / Holding Values
UpdateFlag = str ( theImage.parasite_find ( ' UpdateFlag ' )) Period = str ( theImage.parasite_find ( ' Flow ' )) if ( UpdateFlag == ' YES ' ): if ( Menstruum == ' Standard ' ): { run commands for Standard flow } elif ( Flow == ' SemiAuto ' ): { run commands for SemiAuto Flow } elif ( UpdateFlag == ' NO ' ): { practise nothing } Reading and writing parasites to an epitome does take one idiosyncrasy worth comment on which is the format of the data being written. Yous must express the parasite every bit an ordered set up of 'Name', 'Index', and 'Value'. Proper name and Value are both strings, and the Index is a minor integer, (stay between 1 and 254). If you have not used parasites before yous might be wondering how you determine a 'correct' value for the index. Yous may:
- Throw a sprint at a dartboard and apply the result (assuming you hit the lath).
- Or, feel free to utilise my personal favorite 'v'.
Equally long equally you pick a number and preferably stick with information technology, everything will be fine. When you read the parasite value, the functions in the Scheme scripting interface volition give you the 'Proper name', 'Index', and 'Value'; the functions in the Python scripting interface will merely render the 'Name' and 'Value'.
Writing the parasite is called 'attaching' and reading the value dorsum is called either 'get' or 'find' depending on the method you choose to utilise. You can read and write parasites from within scripts or from either of the python or scheme consoles.
Running the Automation Tools on a Workflow
Our final topic almost an Automated Workflow in our "Broad Strokes" is how to setup and run the Workflow on a fix of images. We are running on a set of images rather than just one then nosotros open upwards gimp without an epitome in the editor window. The tools will open, work on, save, and close the images one past one.
In an earlier tutorial "Automated Jpg to Xcf" nosotros outlined how to import a directory containing jpeg images into a directory with gimp xcf images. The automation tool implementation modifies the import function to add the assignments of parasites to the images. The images are assigned to a particular flow as they are imported, and the initial set of flow command properties are written and saved every bit office of the import process. The jpeg-to-xcf role also runs the Automation Process (Car Update Paradigm) one time to put all of the images on the first step of the assigned catamenia, then they are prepare for their start manual adjustment right after they are imported.
After opening and (optionally) adjusting an image y'all mark the image equally prepare for the next step by setting the "UpdateFlag" parasite to a value of "Aye". This is accomplished with a office that is available from the menu: "Automation → A2 Marker for AutoUpdate (File)". (Note: Since you will be doing this a lot, information technology is very convenient to use a keyboard shortcut to run this function).
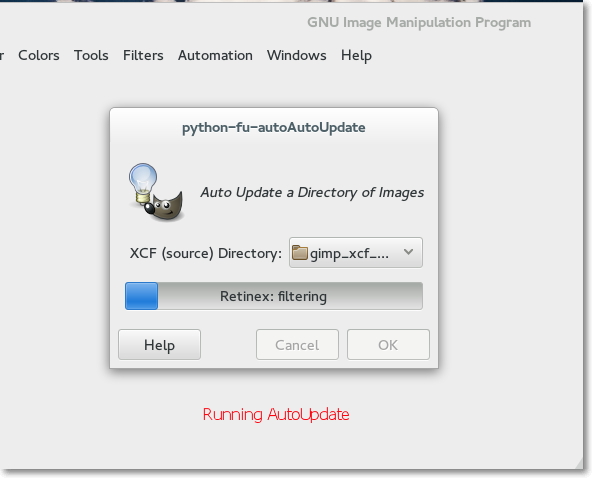
Images are moved to the next step in their menses by running the "Auto Update Images (Directory)" function from the carte. This will increment all of the images whose UpdateFlags are set to YES to the next step in their catamenia. Note that since each image has a record of its own next footstep and period, there is no requirement for the images in a directory to be on the same pace or fifty-fifty using the same workflow.
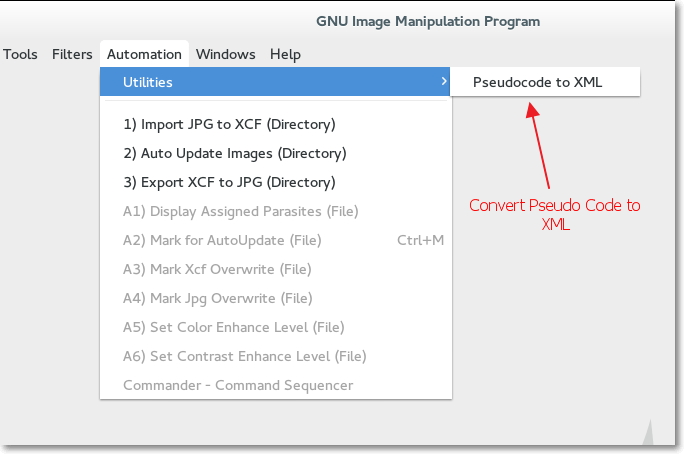
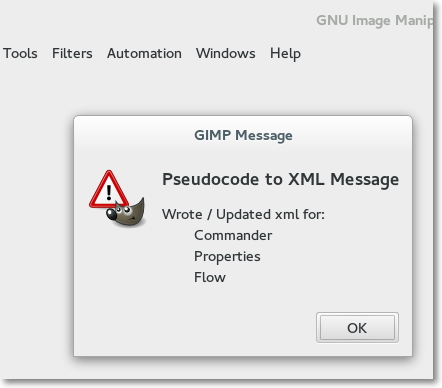
The mechanics for creating XML from pseudo code for the workflows, properties, and commander macros is to run the role Pseudocode to XML from the menu (Automation → Utilities → Pseudocode to XML).
The export XCF to JPG function in the "Automation" carte du jour opens each xcf file in the source / piece of work directory and looks at the properties of the epitome. If the paradigm is "Finished", at the terminate of the flow, information technology is exported. The images that are still beingness piece of work on are left alone.
Pseudo Code
Workflow Pseudo Code
Yous tin generate the list of commands that we wish to perform on an image in the python console and when you lot accept it working just right for the pace y'all would similar to perform you can copy and paste them into a pseudo code text file. The "Pseudocode to XML" function will exist looking for files that take the file extension ".def" so it will convert all of the *.def files in the menses directory into XML.
As in the instance of the macros, you can put in comment lines commencement with "comment>" and blank lines to make the code fragments more readable and easier to sympathise when you come up back to brand enhancements in a couple of months.
Each ready of commands is contained by a "Step" which uses the primal "step>". The superlative level container is the Workflow which uses the key "menstruation>". Each workflow can be specified in its own ".def" file. The "Pseudocode to XML" part will read all of the *.def files and create a single XML file named combinedFlow.xml in the myXml/flow directory.
Holding / Parasite Pseudo Code
The other type of pseudo code that we need to talk near is the code for properties. The pseudo code for backdrop is independent in the "myXml/property" directory. The file flagProperties.xml is created by the "Pseudocode to XML" function from the flagProperties.def file. In the case of properties information technology simply really makes sense to have one ready of backdrop for all flows. The properties defined in the flagProperties.xml file volition exist the "flag" properties. You can set the belongings name, comments, the option values, and the default value (initial setting). The "property>" key sets the property proper noun and contains the other property values inside the XML. The other keys are "comment>", "default>", and "options>". The cardinal "flags>" with the proper name Control Properties is used at the beginning of the file to define the top level container.
There are iii backdrop that are assigned by the automation scripts and are not normally edited past the user or defined in the ".def" file. They are created, read and modified by the scripts. These are the catamenia control properties, "Flow", "CurrentStep", "NextStep".
You can see all of the properties and current assigned values for a particular image using the bill of fare part "Automation" -> "A1) Display Assigned Parasites (File)".
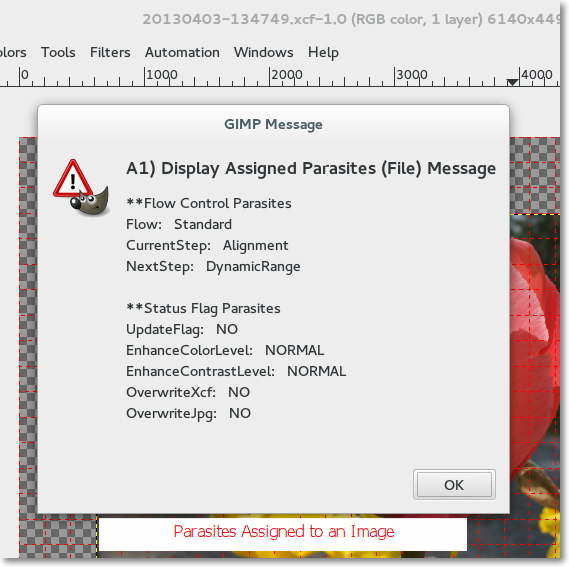
Properties and Paradigm State – Flow Control Parasites
One way to recall of a workflow is equally a series of states. These states are what we have been referring to as steps. Every bit the paradigm evolves it transitions from i state to some other it moves through the workflow from beginning to end, state by state (or step by step).
The Flow Control Parasites provide a method to make each epitome "cocky aware" of its own land, which is its assigned "Menstruation" and "CurrentStep". It is likewise enlightened of the next footstep to which it will proceed, which is determined by its assigned "Menstruum" and "NextStep". The club for the steps is determined past the order they are listed in the pseudo code. When an image is updated the "NextStep becomes the new "CurrentStep" and a new "NextStep" is looked up and written to the image as a parasite.
Allow's examine the steps of the "Standard" flow example that is included with this tutorial. The steps the image will go through are:
Example – States or Steps in the Standard Flow Example
| CurrentStep | NextStep | |
| 1. | First | Alignment |
| 2. | Alignment | DynamicRange |
| iii. | DynamicRange | Retinex-Filter |
| iv. | Retinex-Filter | Sharpen |
| 5. | Sharpen | ColorAdjust |
| vi. | ColorAdjust | FINISHED |
| 7. | FINISHED | FINISHED |
The state "First" is assigned past the Jpeg to Xcf function. This step is assigned automatically regardless of the period. The steps following the "Showtime" step, "Alignment", "DynamicRange", "Retinex-Filter", "Sharpen", and "ColorAdjust" are assigned through the Xml representation of the menstruation. The Step "FINISHED" is assigned automatically when the stop of the list of steps is reached.
When the images are first imported, the autoUpdate function is run to movement the images from the automatically assigned "First" stride to executing the first real stride of the flow. When the CurrentStep becomes "FINISHED", the image is set to be exported by the Xcf to Jpeg office.
Condition Flag Parasites
The Flag Parasites are for decision making. They will exist assigned with a default value when the image is imported into a flow. The parasite whose function is menses control is the "UpdateFlag". The value of the UpdateFlag is read to determine if an paradigm is set to be moved to the adjacent land.
Flag Parasites other than the UpdateFlag can be modified or eliminated to adapt the needs of your pseudo code functions. You could for example add Flags with values that make up one's mind certain layer Opacity, or make up one's mind whether sure filters will be run. There are a lot of possibilities for this powerful capability.
Automation Workflow - Summary
Running an Automated Workflow is almost trivially easy, once you take information technology ready to your liking. In that location is some work to be sure in setting up a workflow, merely the reward is a consistent and apparent (obvious which steps take been run) workflow or process.
There are several things you may need to fix upwards Gimp Preferences in club to optimize the functioning.
Determination
The combination of an available programming language, well suited data structures, the ability to affix properties to images, and a rich set of editing features offer powerful possibilities for automating the editing procedure.
Using an automated workflow has changed the manner that I utilize Gimp for editing my photos. I promise that you can leverage these examples to brand working with Gimp more productive for yourself. Links to the example scripts and pseudo code are in the following appendices.
Appendix – Notes
The following Appendices incorporate notes which are more specific to setting upwards the case scripts, the example *.def files, and comments on debugging.
Setting up the Instance Scripts
All of the example scripts begin with "auto", e.grand. autoAutoUpdate.py, autoBase.py, … If you try them just then decide you don't similar them they should exist pretty easy to find and remove. The following example scripts should exist loaded into your gimp/plug-ins directory. Something like /home/stephen/.gimp-2.8/plug-ins if your user name is stephen and you were using gimp 2.8. Click on the filename to download.
- autoAutoUpdate.py Runs the automobile update function on a directory of images.
- autoBase.py Contains the classes that read and write the XML files that affect how the update works.
- autoCommander.py Runs the 'Commander' macros.
- autoJpegToXcf.py Imports the images into xcf format and assigns properties to image.
- autoRWparasites.py User Interface functions to read and write image parasites from the bill of fare.
- autoWriteXml.py Reads *.def files and generates XML for commander macros, workflows, and properties.
- autoXcfToJpg.py Exports the finished images back to jpeg format.
Setting upwards the Example Pseudo Code
Underneath your gimp directory (something similar /dwelling house/stephen/.gimp-2.8) yous demand to create a directory named 'myXml'. Don't get creative here, the scripts are looking for this specific directory. It will be in the aforementioned directory that contains your plug-ins directory. Underneath the myXml directory create three more directories, 'commander', 'menses', 'holding'. These will be where your pseudo code and three kinds of XML will exist located.
Pseudo Code for Commander Macros
Copy the following example *.def files into the "commander" directory (/dwelling/stephen/.gimp-2.8/myXml/commander – bold a home directory of /user/stephen and a gimp version 2.8). They are example Commander Macros pseudo code files. Click on the filename to download.
- centeredgrid.def
- colorAdjust.def
- createColorLayer.def
- createDynamicRangeLayer.def
- expandCanvas.def
- normalGridCanvas.def
- renameBaseLayer.def
- retinexLayer.def
- sharpenLayer.def
Hopefully with the comments and by running them, their part will exist apparent. They should be enough to get you started writing some macros of your own.
When yous run the "Pseudocode to XML" Utility function, it will read all of the *.def files in this directory and write an XML file in this directory chosen "combinedCommander.xml". "combinedCommander.xml" is the file that is accessed to list and run all of your macros.
Pseudo Lawmaking for Automation Workflows
Re-create the following *.def files into the "menstruation" directory (/abode/stephen/.gimp-2.eight/myXml/menstruation). They are instance Workflow pseudo code files.
- fullauto.def
- semiauto.def
- standard.def
These 3 workflows all follow the same basicsteps of the standard workflow. The semiauto and fullauto workflows combine some of the steps. The idea is to give you a couple of different workflows to play with. The fullauto illustrates that you really can pack a lot of editing into a "stride" but is probably besides automatic to be of practical utilize.
When you run the "Pseudocode to XML" Utility part, it will read all of the *.def files in this directory and write an XML file in this directory chosen "combinedFlow.xml".
Pseudo Code for Properties
Copy the following *.def file into the "property" directory (/home/stephen/.gimp-2.8/myXml/property). It is an example Property pseudo code file (for Flag Properties / Parasites).
- flagProperties.def
When you run the "Pseudocode to XML" Utility function, it will read *.def file in this directory and write an XML file in this directory called "flagProperties.xml".
Pseudo Code Syntax
Commander Pseudo Code
In that location are iii keywords used for writing commander pseudo lawmaking:
-
commander>- The text post-obit this keyword is the Macro Name. This keyword must be the first keyword in the file. This is the "container" or the root of the tree for the following comments and commands. -
comment>- The text following this keyword is for descriptive comments. The comments will be represented in the pseudo code *.def file and in the resulting XML. When the XML is read for processing, comments will be ignored. -
>>>- The text following this keyword is taken as a python statement. Then the resulting XML is read, the command statements will be passed to the commander script to be processed in order.
Notation that lines outset with "#" are ignored. Yous may indent if you like for readability. Leading white space is stripped off.
Instance - Commander Pseudo Code Case
commander > Centered Filigree comment >** Set upward the grid for Rotate and or Perspective Transform comment >* Set values from python - fu paradigm object >>> centerX = theImage.width / two >>> centerY = theImage.height / 2 >>> gridSpacing = max ( theImage.width, theImage.acme ) / 24 comment >* configure filigree with PDB functions >>> pdb.gimp_image_grid_set_offset ( theImage, centerX, centerY ) >>> pdb.gimp_image_grid_set_spacing ( theImage, gridSpacing, gridSpacing ) >>> pdb.gimp_image_grid_set_style ( theImage, GRID_ON_OFF_DASH ) Belongings Pseudo Code
There are five keywords used for writing property pseudo code:
- flags - The text post-obit this keyword is the peak level container, or in other words, the root of the tree.
- holding - The text post-obit the keyword is the proper noun of the property / parasite. This is a second level container or a branch of the tree. It will contain all of the post-obit leaf keywords (annotate, default, and pick) until the next property statement.
- comment - The text following this keyword is for descriptive comments. The comments will be represented in the pseudo code *.def file and in the resulting XML. When the XML is read for processing, comments will exist ignored. The comments are leafs of the tree.
- default - The text post-obit this keyword is the default property value. The default value is a leafage of the tree.
- option - The text following this keyword is ane of the possible property values. In that location tin can be several option values for any given property. The option values are leafs of the tree.
Example - Belongings Pseudo Code Example
flags > Control Properties property > UpdateFlag comment > Initial value fix on import to Xcf comment > Set up past user on Prototype from Automation Card comment > Read by autoAutoUpdate ( updateImage function ) annotate > Updates Image ( executes Next Step in Catamenia ) if YES annotate > Reset to NO by updateImage default > YES option > NO option > YES belongings > EnhanceColorLevel default > NORMAL option > EXTRA option > NORMAL option > MID selection > NONE Menses Pseudo Lawmaking
There are iv keywords used for writing period pseudo code:
-
mensesThe text following this keyword is the top level container, or in other words, the root of the tree. This is the name of the flow. -
stepThe text following this keyword is the first level branch from the root. The step contains comments and commands. The steps select groups of commands for execution. -
annotateComments are leafs of the tree. -
>>>Commands are leafs of the tree. When the Xml is read the commands will be candy in the order in which they appear in the step.
Lines showtime with a "#" are ignored. Leading white space earlier the keywords is stripped out. White space after the keyword is stripped out.
Running code in the Gimp Python Console
The Python-Fu panel is a python shell in which you tin can run not simply the gimp pdb functions, but your ain python functions as well.
First, set and verify Python Path to include your user plug-ins directory:
Example – Setting the Python path in the Python-Fu Console
>>> import sys >>> sys . path . append ( '/abode/stephen/.gimp-ii.eight/plug-ins/' ) >>> sys . path echos back a list of paths that include path added above
Side by side, run your python functions in the Gimp Python-Console . This case uses the 'TestBench' class to run functions in the other classes in the autoBase.py module. Object instances of the TestBench class echo back results to the screen.
- Ready the working directory to the user plug-ins directory
- Import the autoBase module functions
- Create and case of the TestBench form
- Run the TestXmlGen and TestXmlRead functions
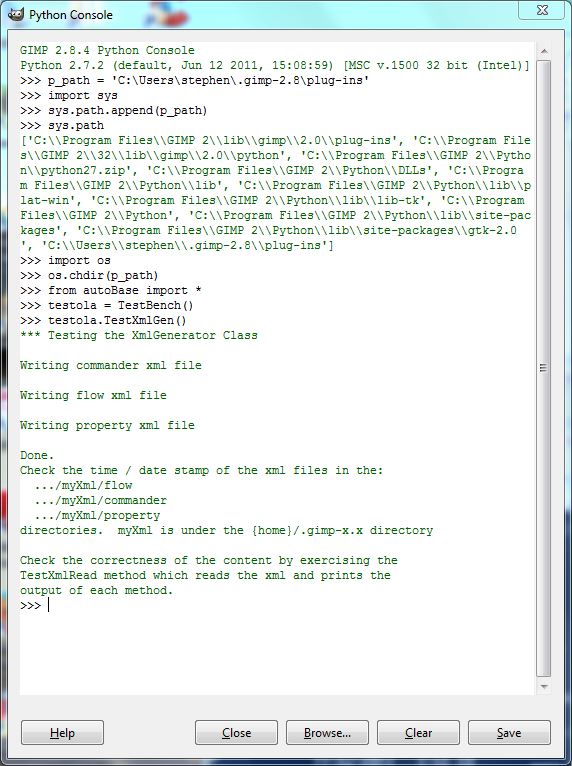
Example – Running your own Functions in the Python-Fu Console
>>> import os >>> os . chdir ( '/home/stephen/.gimp-ii.8/plug-ins' ) >>> from autoBase import * >>> testola = TestBench () >>> testola . TestXmlGen () >>> testola . TestXmlRead () The screen shot below illustrates the process on the Windows version of Gimp / Python Panel (TestXmlGen is pictured, TestXmlRead produces several pages of output):
Further Reading
- Automated JPG to XCF

GIMP Tutorial - Automate Editing by Stephen Kiel is licensed under a Creative Commons Attribution-ShareAlike 3.0 Unported License. The code sources in this tutorial are licensed past Stephen Kiel under the conditions of the GNU Public License GPL V3.
Source: https://www.gimp.org/tutorials/Automate_Editing_in_GIMP/
Posted by: bagleylatepred.blogspot.com
0 Response to "How To Professionally Edit Makeup In Gimp"
Post a Comment